Accounting
Info
Available only if the Accounting module is active. You need the Can visualize Accounting permission; to record entries, issue receipts and close the fiscal year, Can manage Accounting.
The organization's cash book inside AppToMe: cash and bank, income and expenses with their supporting documents, the member register with the fees, numbered receipts for fees and donations, the year-end close and the files to hand to the accountant.
On this page, accounting viewers are those with the Can visualize Accounting permission, and accounting managers those with Can manage Accounting, which includes the first. Administrators always have both.
The two permissions apply only to staff, that is to people with the Staff switch on in their record, and they start off: amounts, donors and members are sensitive data, and until an administrator grants them only administrators see the accounting. Volunteers see nothing of it, not even their own fees. See Roles and permissions.
How it is enabled
Accounting is switched on from Plan and contract, like the other modules: see Plan and contract. Once it is active, permissions decide who sees it, in the Accounting tab of Change permissions.
What changes in the app
With the module active:
- the menu shows the Accounting entry, with the tabs Overview, Journal, Members, Receipts, Contacts and Fiscal years;
- with the gear at the top right of Accounting, accounting managers open Accounting settings; the arrow in the same place takes you back;
- the menu shows the Deadlines entry, if Vehicle management had not already added it: the filing of the annual report and the renewal of the fees are there, see Accounting deadlines.
Accounting viewers who do not manage it read everything and download receipts and exports, but do not find the buttons to record, issue or close.
First steps
The first time you open Accounting, the Overview shows Let's start with the accounts. From there:
- Tap Create the first account and create the cash box: Name, Type Cash, and in Account opening balance how much is in the cash box on the Opening date. See Accounts.
- Open Accounting settings with the gear and add the bank account with New account, with its balance on the same date.
- Look at the Categories: the module comes with a ready-made list of income and expense categories. Rename, add or archive the ones you do not need. See Categories.
- For receipts: ask an administrator to complete the Billing details in Plan and contract, and fill in the Receipts box of the settings. See Receipt details.
- For members: create the year's fee in Yearly fees in the settings, then add the members from the Members tab. See Members.
From then on, the everyday work is recording entries.
Overview
The Overview is the first tab: how the accounts stand today, at a glance.
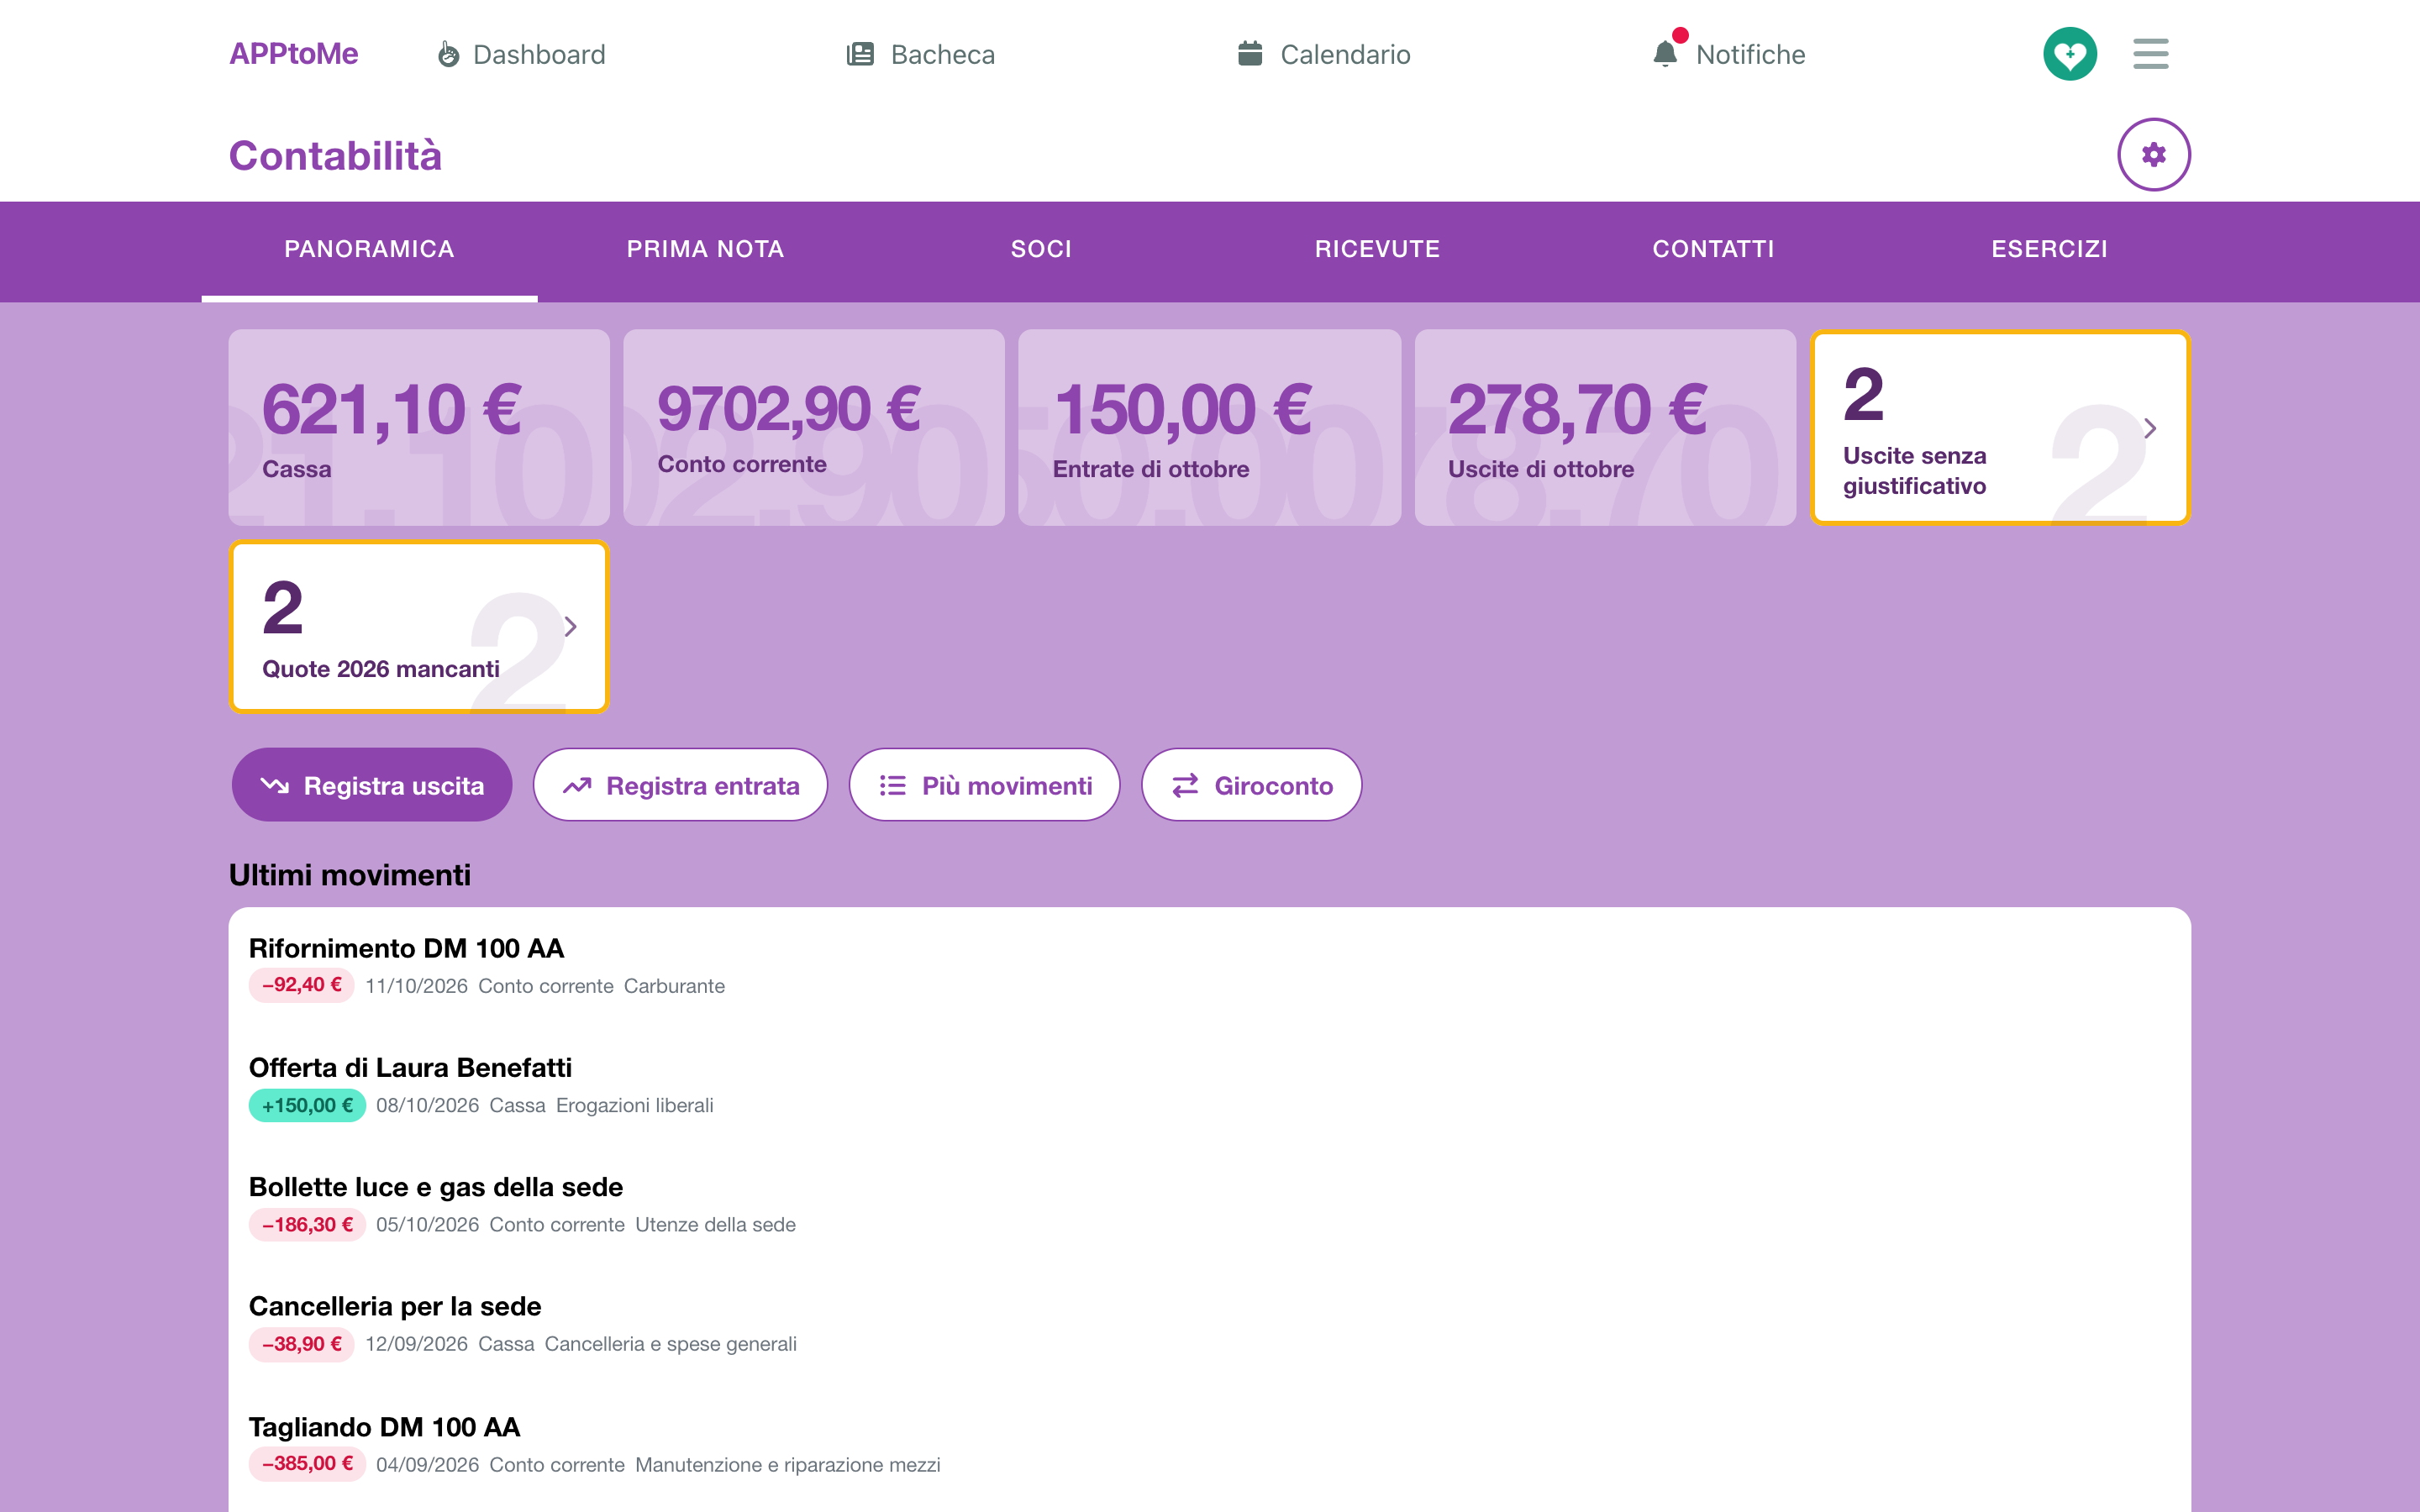
At the top, the tiles:
| Tile | What it shows |
|---|---|
| one tile per account | today's balance. A balance below zero is coloured |
| Income in … / Expenses in … | the total of the current month |
| Expenses without a document | the year's expenses with no file attached. Tap it to see them in the Journal |
| … fees missing | the members who have not paid the year's fee yet. Tap it to open the Fees. It appears only if the year's yearly fee is set |
Below, accounting managers find the buttons to record: Record an expense, Record income, Several entries and Transfer. See Recording entries.
At the bottom, the Latest entries: tap one to open it, or See all for the Journal.
If the current year is already closed, a notice appears at the top: The … fiscal year is closed: this year's entries can no longer be recorded, edited or deleted.
Recording entries
You need the Can manage Accounting permission and an open fiscal year. The commands are in the Overview and, in the Journal, under the + button (New entry).
An income or an expense
- Tap Record an expense or Record income: New expense or New income opens.
- Fill in the fields below: date, amount, account, category and payment method are required.
- Tap Save. The app confirms with Entry recorded.
| Field | Type | What it does |
|---|---|---|
| Date | date, required | the day of the entry: it also decides its fiscal year |
| Amount | amount, required | in euros, greater than zero, with at most two decimals |
| Account | choice, required | where the money leaves from or comes into. With only one account, it is already chosen |
| Category | choice, required | the entry's category, among the expense or income ones |
| Payment method | choice, required | Cash payment, Bank transfer, Card, POS, Cheque or Other traceable |
| Commercial | yes/no | on for a commercial activity; off, the entry is institutional |
| Description | text | what it is. In lists it becomes the entry's title |
| Person | person | who paid or was paid, if they are among the organization's people |
| Contact | contact | Whoever is not in the list of people: choose a person or a contact, not both |
| Vehicle | choice | the vehicle the expense refers to: fuel, repairs, road tax |
| Tags | multiple choice | to group entries, see Tags |
If the payer is not among the Contacts yet, create them without closing the window: in its gear tap New contact, save it, then pick it in the Contact field (Contact created: pick it in the entry.).
For a donation or a fee, always choose who paid: without a person or a contact the receipt cannot be issued.
A transfer
A transfer moves money between two of your own accounts, for instance cash paid into the bank: it is neither income nor an expense.
- Tap Transfer: New transfer opens.
- Fill in Date, Amount, Account (where it leaves from) and To account (where it goes). The two accounts must be different.
- If you like, add Description and Tags, then tap Save.
Several entries at once
To record a week's receipts or a day's offerings in one go. Tap Several entries: a page of its own opens.
- At the top choose Expenses or Income.
- Choose Account and Payment method once: they apply to every line. In Date of the lines write the date new lines take on their own.
- Fill in one line per entry: Date, Category, Amount, Description, and optionally Person and Tags. Add line adds another; the X next to Line … removes it. At the bottom you read the Total.
- Tap Record … entries.
All the lines are recorded, or none: if a line has an error, the app writes it under the wrong field and records nothing. Correct it and tap Record again.
The lines stay on the phone until they are recorded, even if you close the app: you find them again by reopening Several entries, kept apart for expenses and income. If the connection drops while recording, the app writes No answer from the server: try again. The lines stay here and the entries will not be recorded twice.: try again without fear of duplicates.
The Commercial field is not here: each entry takes it from its category, see Categories.
Journal
The Journal is the list of every entry, newest first.
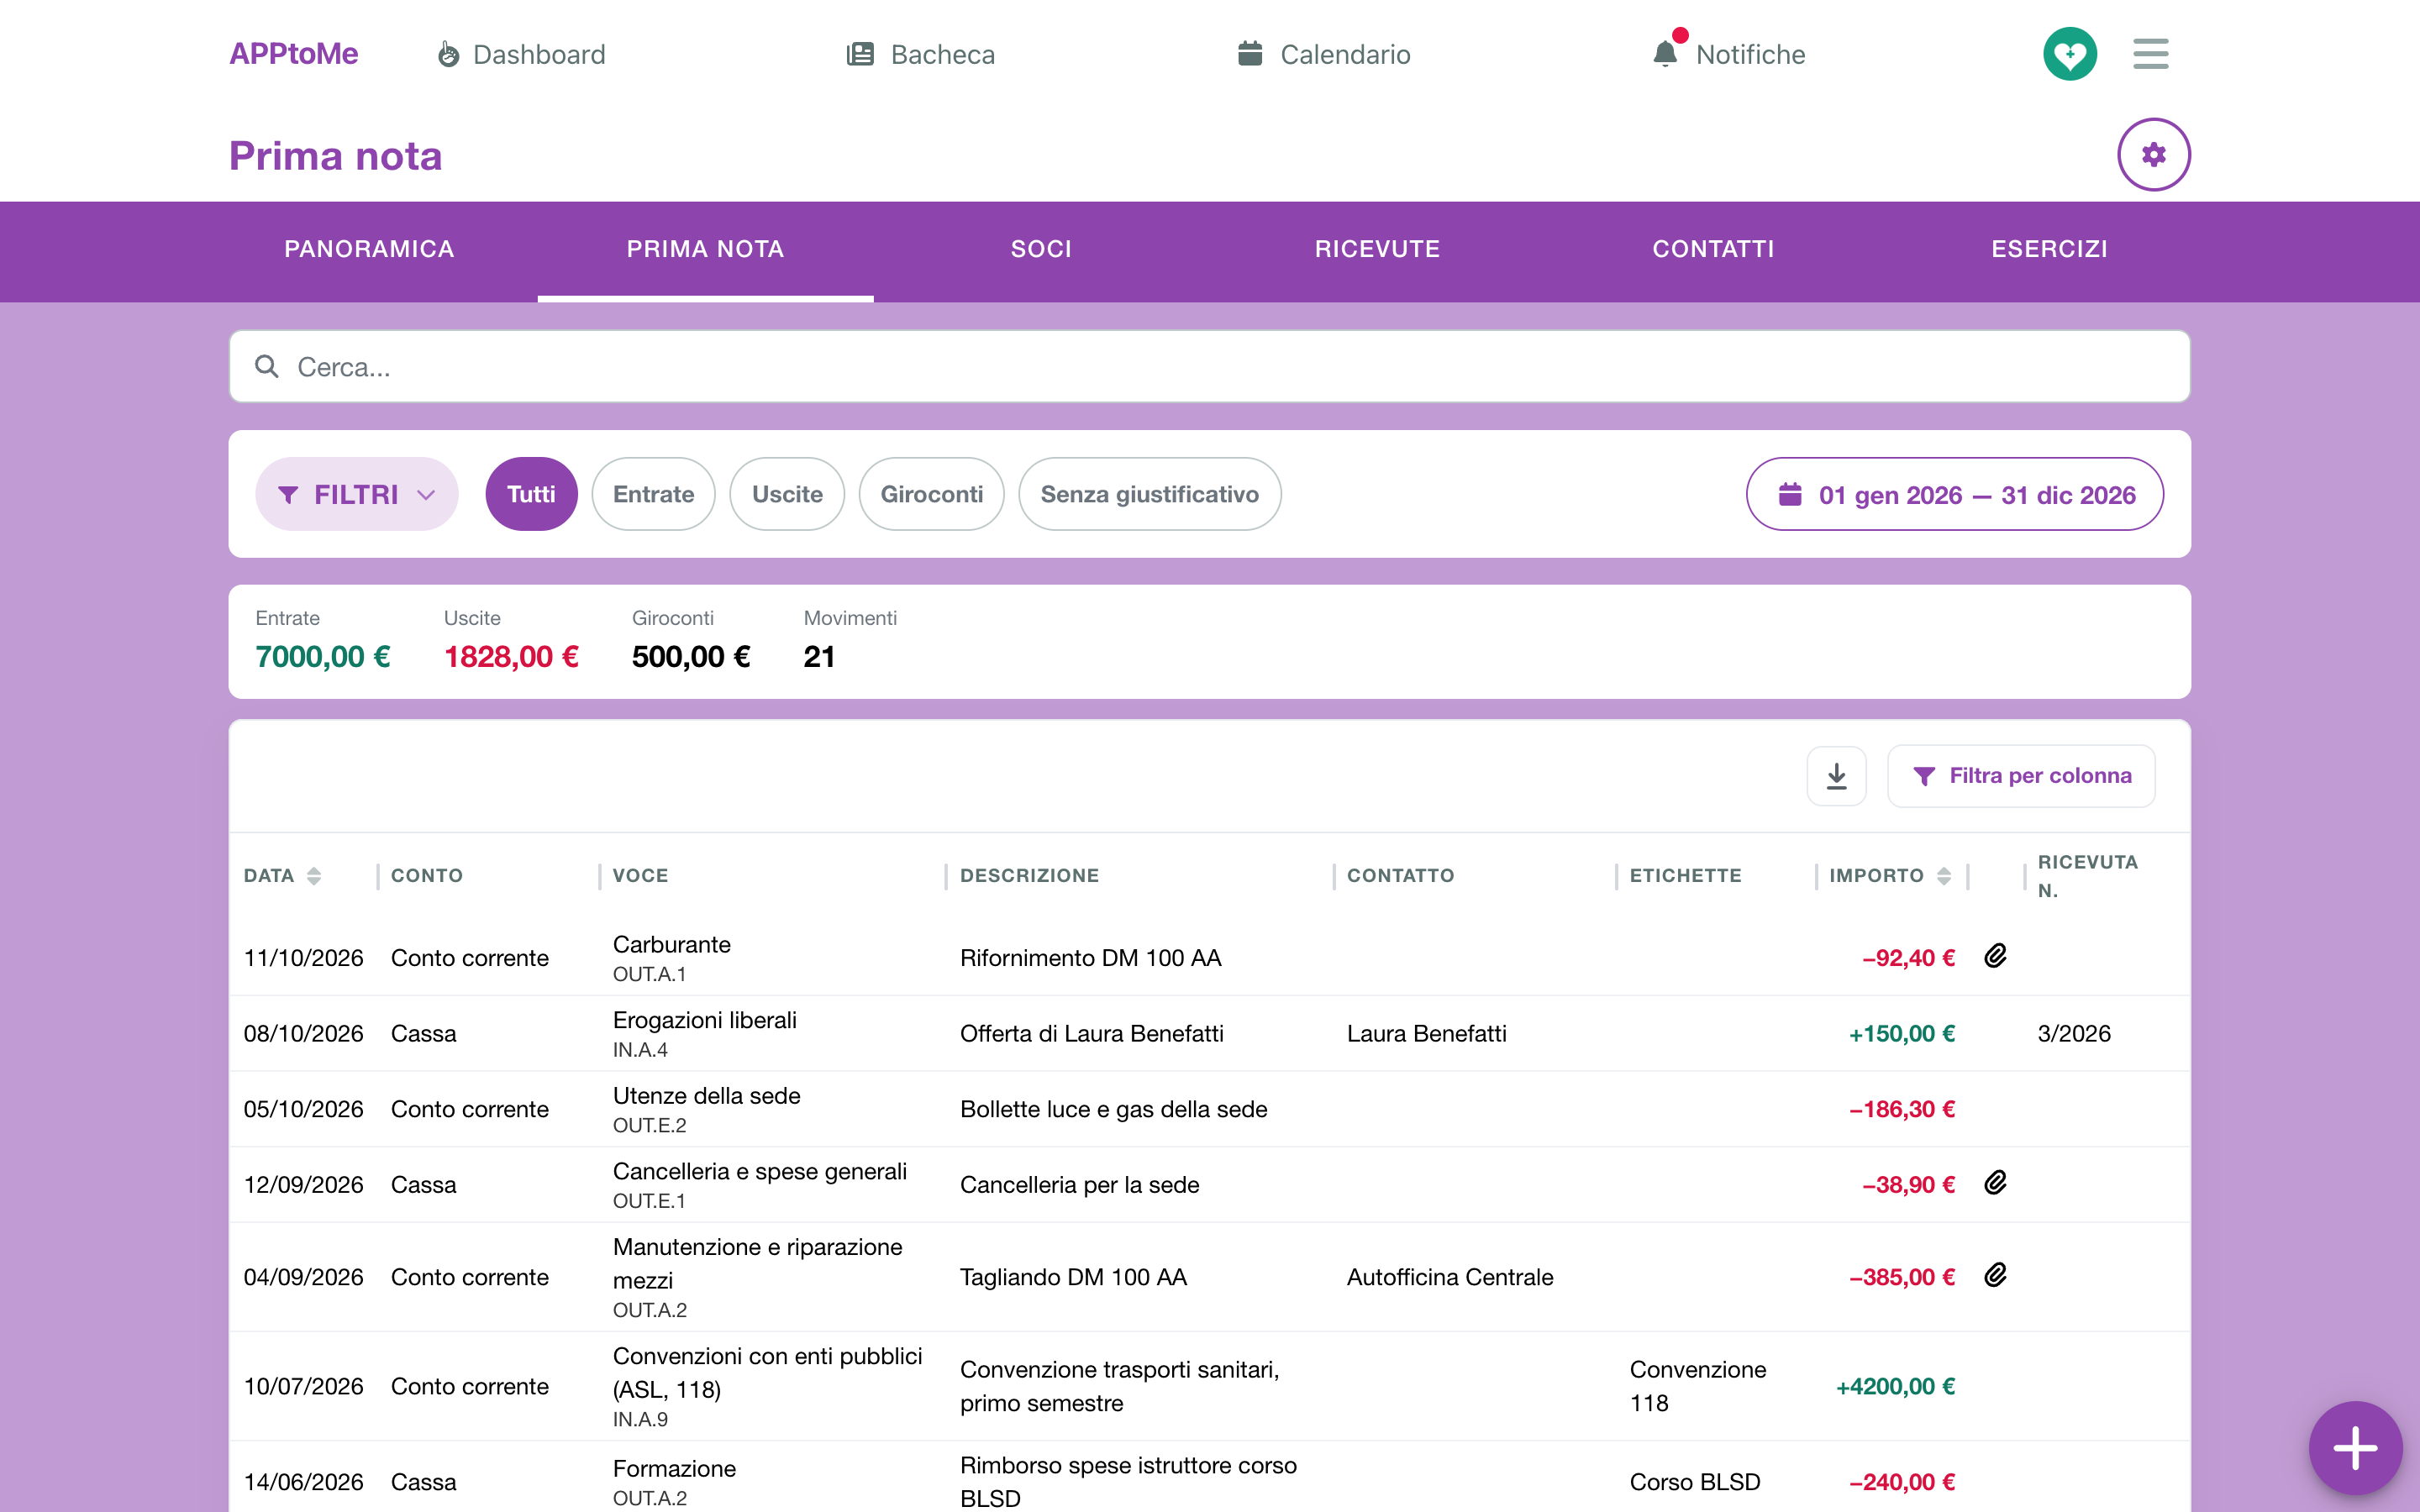
By default it shows the current month. To see more:
- at the top choose All, Income, Expenses, Transfers or Without a document (only expenses with no file attached);
- change the period with the dates;
- in Filters choose an Account, a Category or a Tag, then tap Send; Reset clears them all;
- Search... finds an entry; on a wide screen, with Filter by column, you also filter Account, Category, Description, Contact, Tags and Receipt no..
Above the list, the totals of exactly what the filters select: Income, Expenses, Transfers and the number of Entries.
| Column | What it shows |
|---|---|
| Date | the day of the entry |
| Account | the account; for a transfer, from which to which |
| Category | the category, with the Modello D line below it |
| Description | what it is |
| Contact | the person or contact who paid or was paid |
| Tags | the entry's tags |
| Amount | income in green, expenses in red |
| paperclip | the entry has at least one supporting document |
| Receipt no. | the receipt number, if there is one |
On the phone, title, amount, date, account and category remain.
The download arrow at the top of the list exports the journal as XLSX or CSV, with the same filters you see.
The entry
Tap an entry to open its page: the amount, the type (Income, Expense, Transfer between accounts or Account opening balance) and the recorded data. At the bottom, Recorded by … and Last changed by … say who entered it and who last changed it, with date and time.
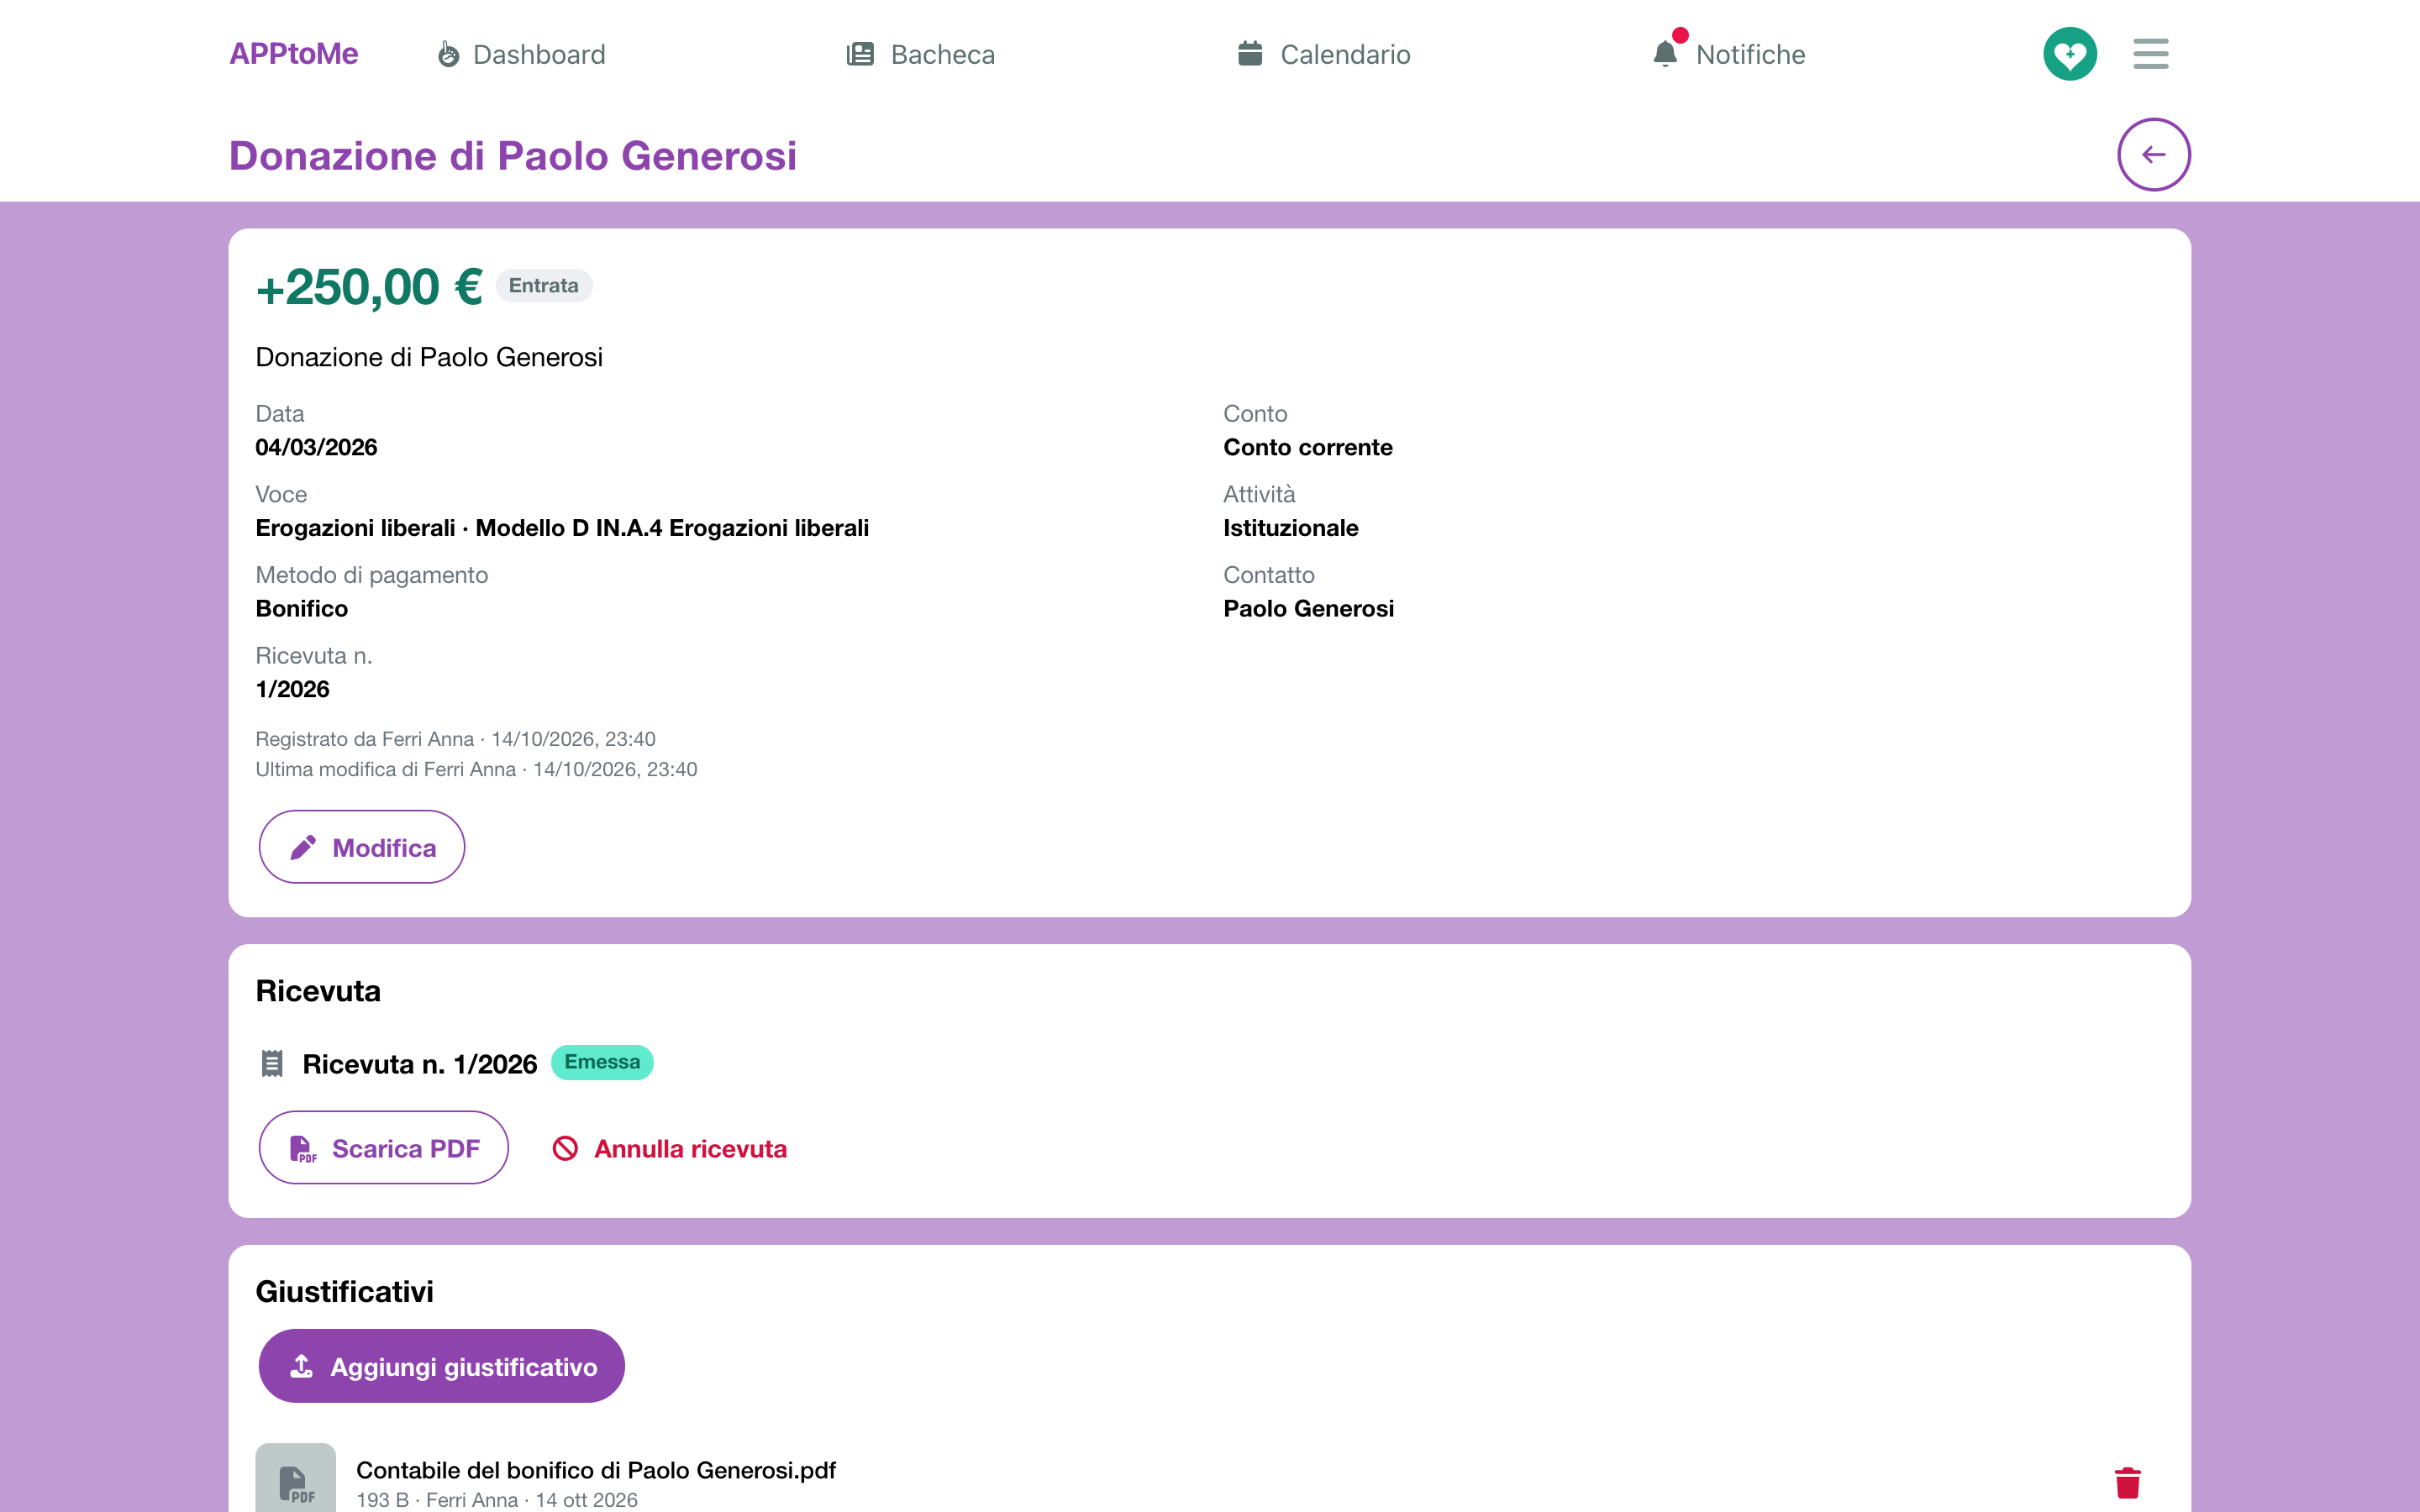
Accounting managers find:
- Edit — reopens the entry's window. The type does not change: an expense recorded as income is deleted and recorded again;
- Delete — the app asks Delete this entry? Its attached documents are deleted with it.
An entry with a receipt cannot be deleted: an issued receipt must be voided first, and a voided one is kept together with the entry. An entry of a closed fiscal year can be neither edited nor deleted: the page says so with The fiscal year of this entry is closed: it can be neither edited nor deleted.
Below the data, an income entry that can have a receipt shows the Receipt box, see Receipts.
Supporting documents
Till receipts, invoices, bank transfer slips: each entry has its Supporting documents box.
- Tap Add a document and choose a photo or a PDF, or, from the phone, Take a photo of the till receipt.
- The file is attached at once: Document added. At most 5 MB per file.
Accounting viewers open the documents; managers add and delete them while the fiscal year is open. Expenses without a document are counted in the Overview and found with the Without a document filter.
Contacts
Contacts are those who are not among the organization's people: an outside donor, a body that grants a contribution, a supplier. They stay inside the accounting: they do not enter the registry, the shifts or the staff lists.
The columns are Name, Type (Person or Organization), Fiscal code / VAT no. and Email. With Archived you see the archived contacts.
Accounting managers add a contact with + (New contact) and change it by tapping it:
| Field | What it does |
|---|---|
| Name | required: first and last name, or the legal name |
| Type | Person or Organization |
| Fiscal code, VAT number | they go on receipts and summaries |
| the address to reach them | |
| Address, Postcode, City, Province | the address on the receipt |
| Person | When the contact is also a member or a volunteer |
| Notes | free notes |
If the fiscal code already belongs to another contact, the app says so after saving, without blocking it: check you do not have a duplicate.
In the contact's gear you find Summary for the current year and the one before: the PDF of the contact's donations in that year, which the donor needs for their tax return. If there are no donations that year, the app writes No liberal donations in … Accounting viewers who do not manage it find the summaries by tapping the contact.
A contact is never deleted: you Archive it from the gear, and Restore brings it back. Once archived, it can no longer be chosen in new entries.
Members
The Members tab has two parts: Register and Fees.
Register
The list of members, with No., Surname and name, Fiscal code, Admitted on, Ended on and the year's Fee (Paid or Missing). At the top choose Active, Ended or All.
To admit members, accounting managers tap + (Add members):
- Tap Choose people and select the people of the organization to admit, many at once if you like.
- Check the Admitted on date.
- Tap Add … members.
Each member gets the register's next number. Whoever is a member already is skipped. A number is never reused: someone who leaves and comes back is added again and gets a new number, and the register keeps the history.
Tap a member for Edit member:
| Field | What it does |
|---|---|
| Admitted on | the admission date |
| Ended on | the date the member leaves: from the next day they are no longer active |
| Reason for leaving | Resignation, Exclusion, Death or Other; required with Ended on |
| Notes | free notes |
Export the register downloads the register of one day, as XLSX or PDF: choose the date in Register on. The register is that of one day: the members admitted by that date and not yet ended.
Fees
The fees of one year at a time: choose the Year at the top.
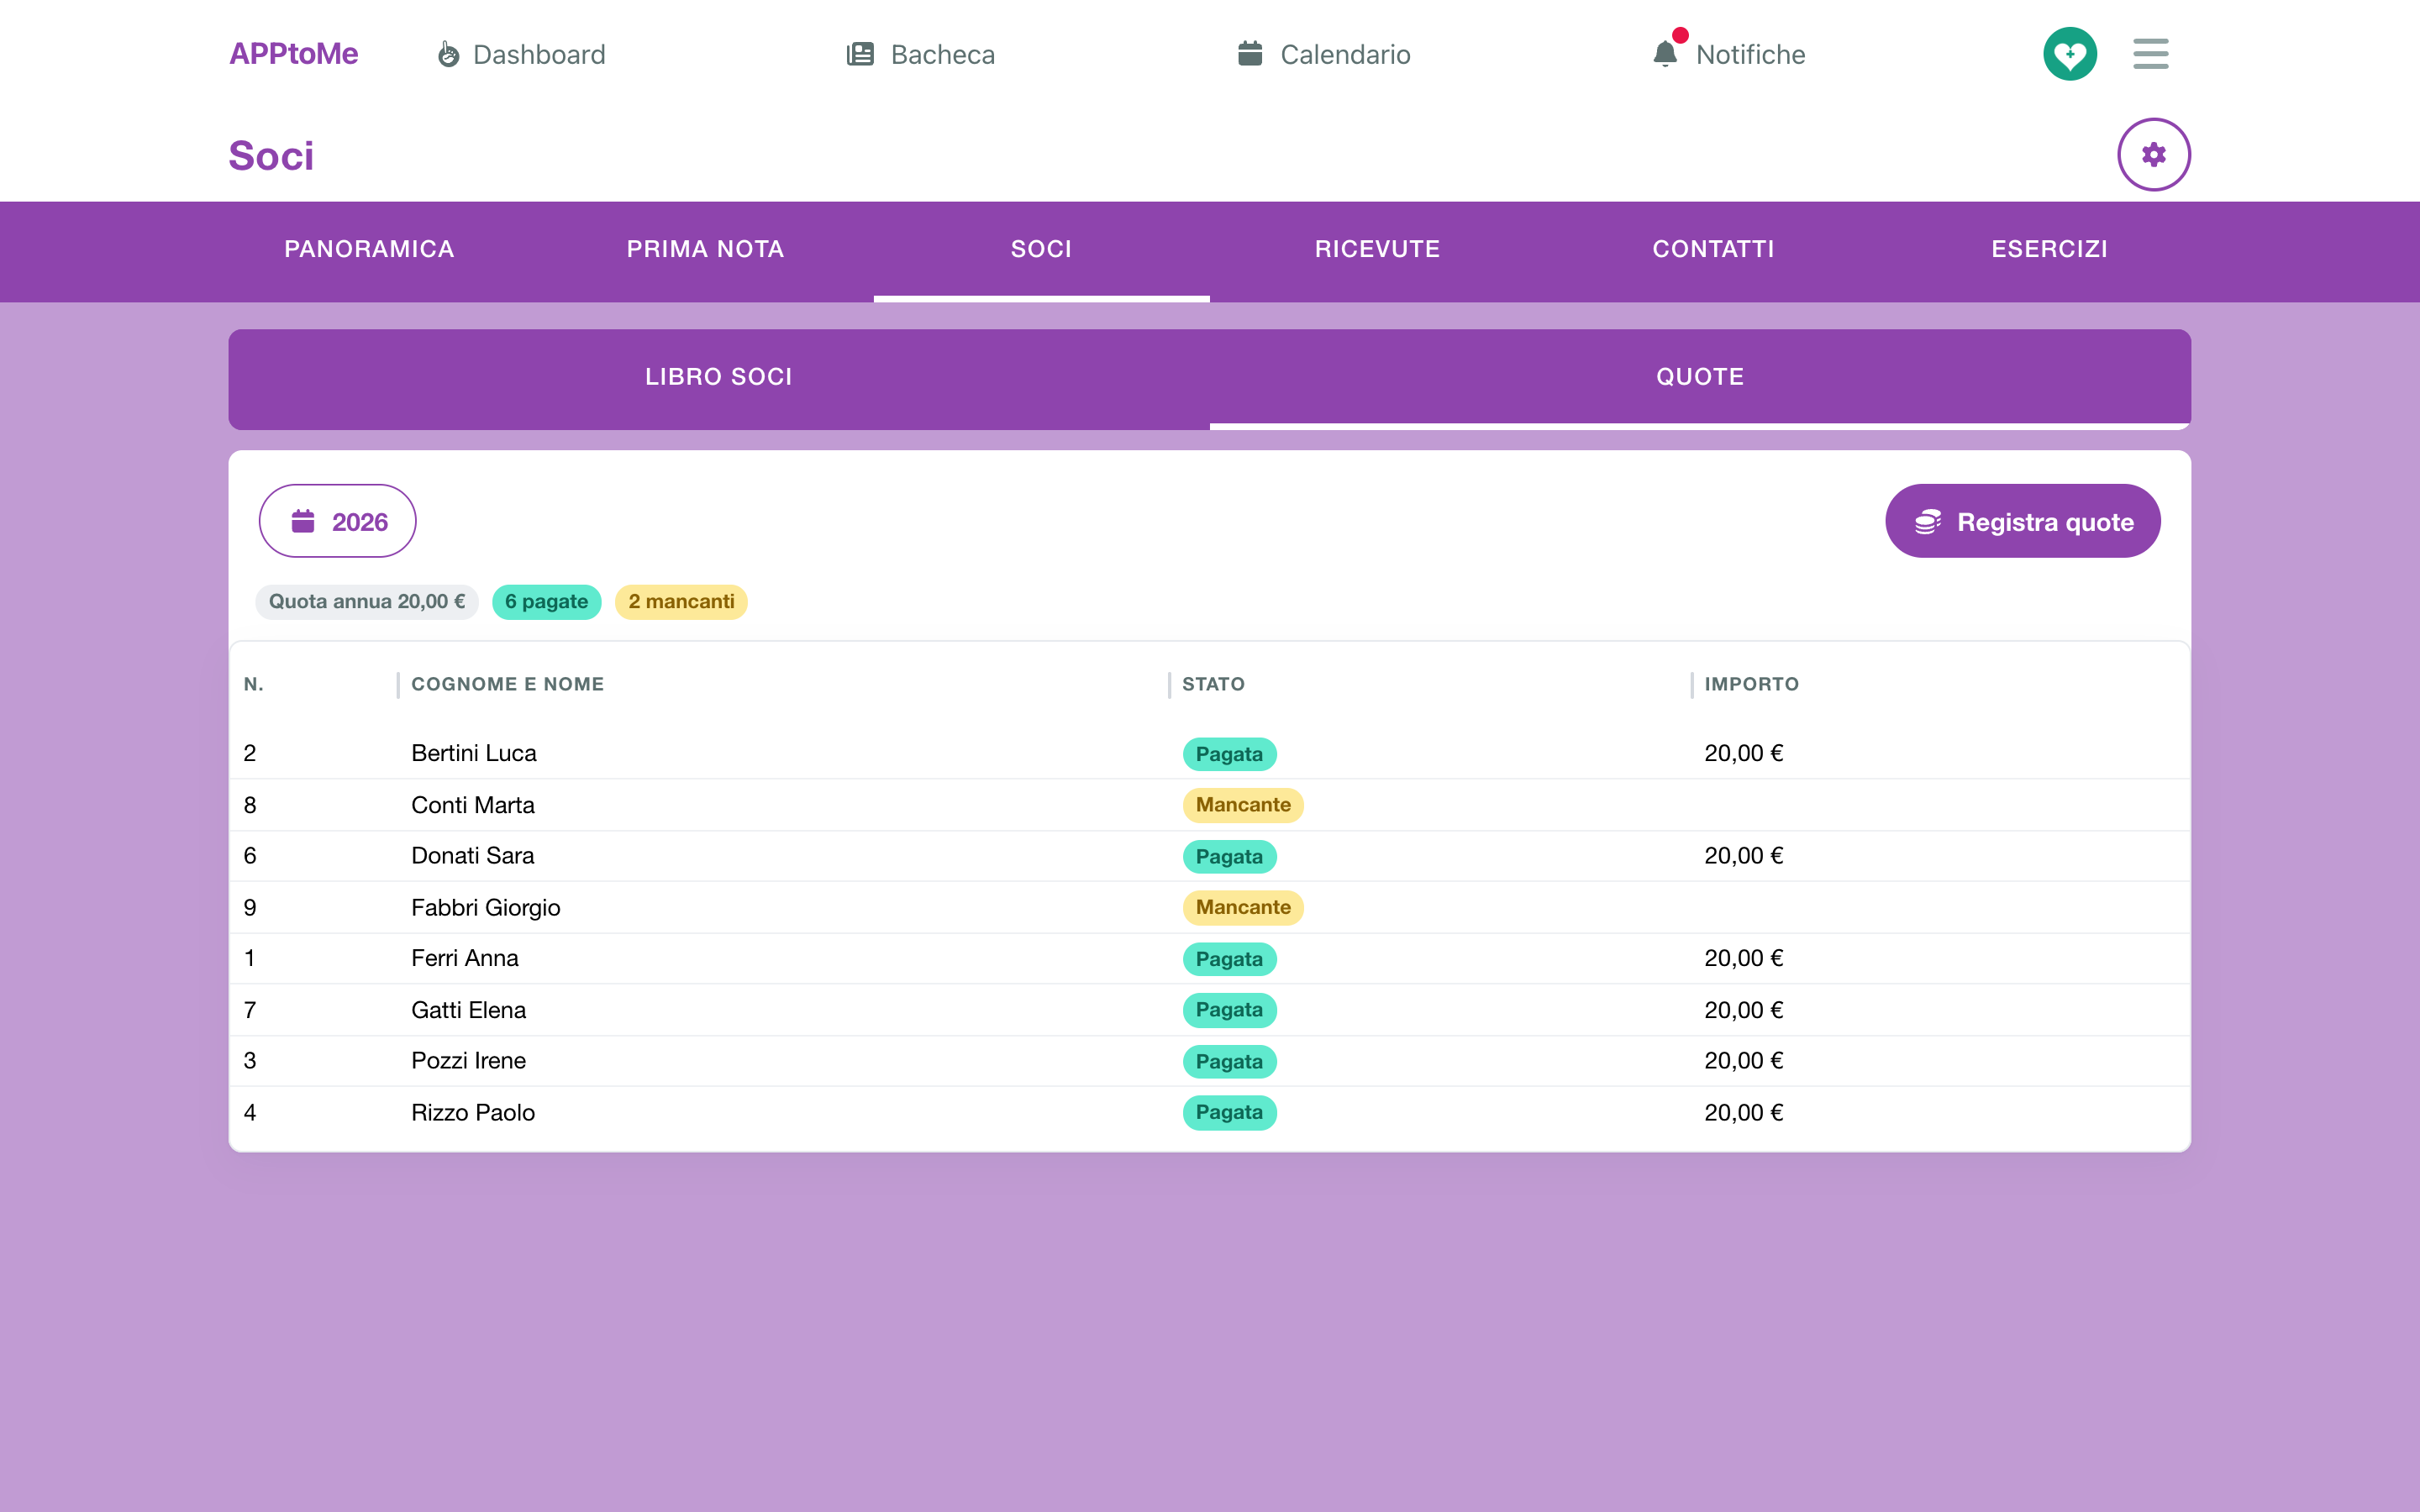
At the top the year's Yearly fee, how many fees are paid and how many missing; below, member by member, Status and Amount. Tap a paid fee to open the entry that records it.
If the year has no yearly fee, the app writes There is no yearly fee for … and accounting managers find Set the yearly fee.
To record the fees collected:
- Tap Record fees: Record the … fees opens, with every member who has not paid yet.
- Choose Account, Payment method and Date. The Fee per member is already the yearly one.
- Leave selected the members who have paid (Select all / Deselect all).
- Tap Record … fees.
Each fee becomes an income entry in the Journal, in the member's name, on the membership fees category. Those who have paid already are skipped, and trying again after a dropped connection records nothing twice.
Fees are recorded from here
A fee recorded by hand with Record income goes into the journal, but the member stays Missing: for fees always use Record fees.
The member who owes a year's fee is one active today, for the current year; on 31 December, for a past year.
Receipts
The numbered receipts for membership fees and donations, with the PDF to give to whoever paid.
Issuing a receipt
It is issued from the entry's page, in the Receipt box. The box appears only on an income entry that can have one: a fee, or an income entry on the liberal donations category, with the person or contact who paid. Services, public contributions and agreements get no receipt.
- Open the entry and tap Issue receipt.
- The app asks Issue the receipt? — The receipt takes the next number of the year and cannot be deleted: if it is wrong, it is voided.
- Tap Issue receipt.
The receipt takes the year's next number, for instance Receipt no. 3/2026, and its type from the entry: Membership fee, Traceable donation or Cash donation. Download PDF downloads it.
The receipt captures the entry as it was when issued. If you later change the amount, date or payer, the box warns that the receipt still shows the data of that time: void it and issue a new one.
If the organization's data are missing, the app opens Organisation data missing with the list of what is missing and Open settings: see Receipt details.
Voiding a receipt
A wrong receipt is not deleted: it is voided.
- Tap Void receipt, in the entry or in the list of receipts.
- Write the Reason for voiding (required).
- Confirm with Void receipt.
The receipt stays in the list as Void, with the reason; its number is not reused and the PDF carries the word «VOID». From the entry you can then issue a new one.
The list of receipts
The Receipts tab lists the receipts of one year, newest first: choose the Year at the top. Search... finds a receipt; on a wide screen, with Filter by column, you also filter No., Payer, Type and Status.
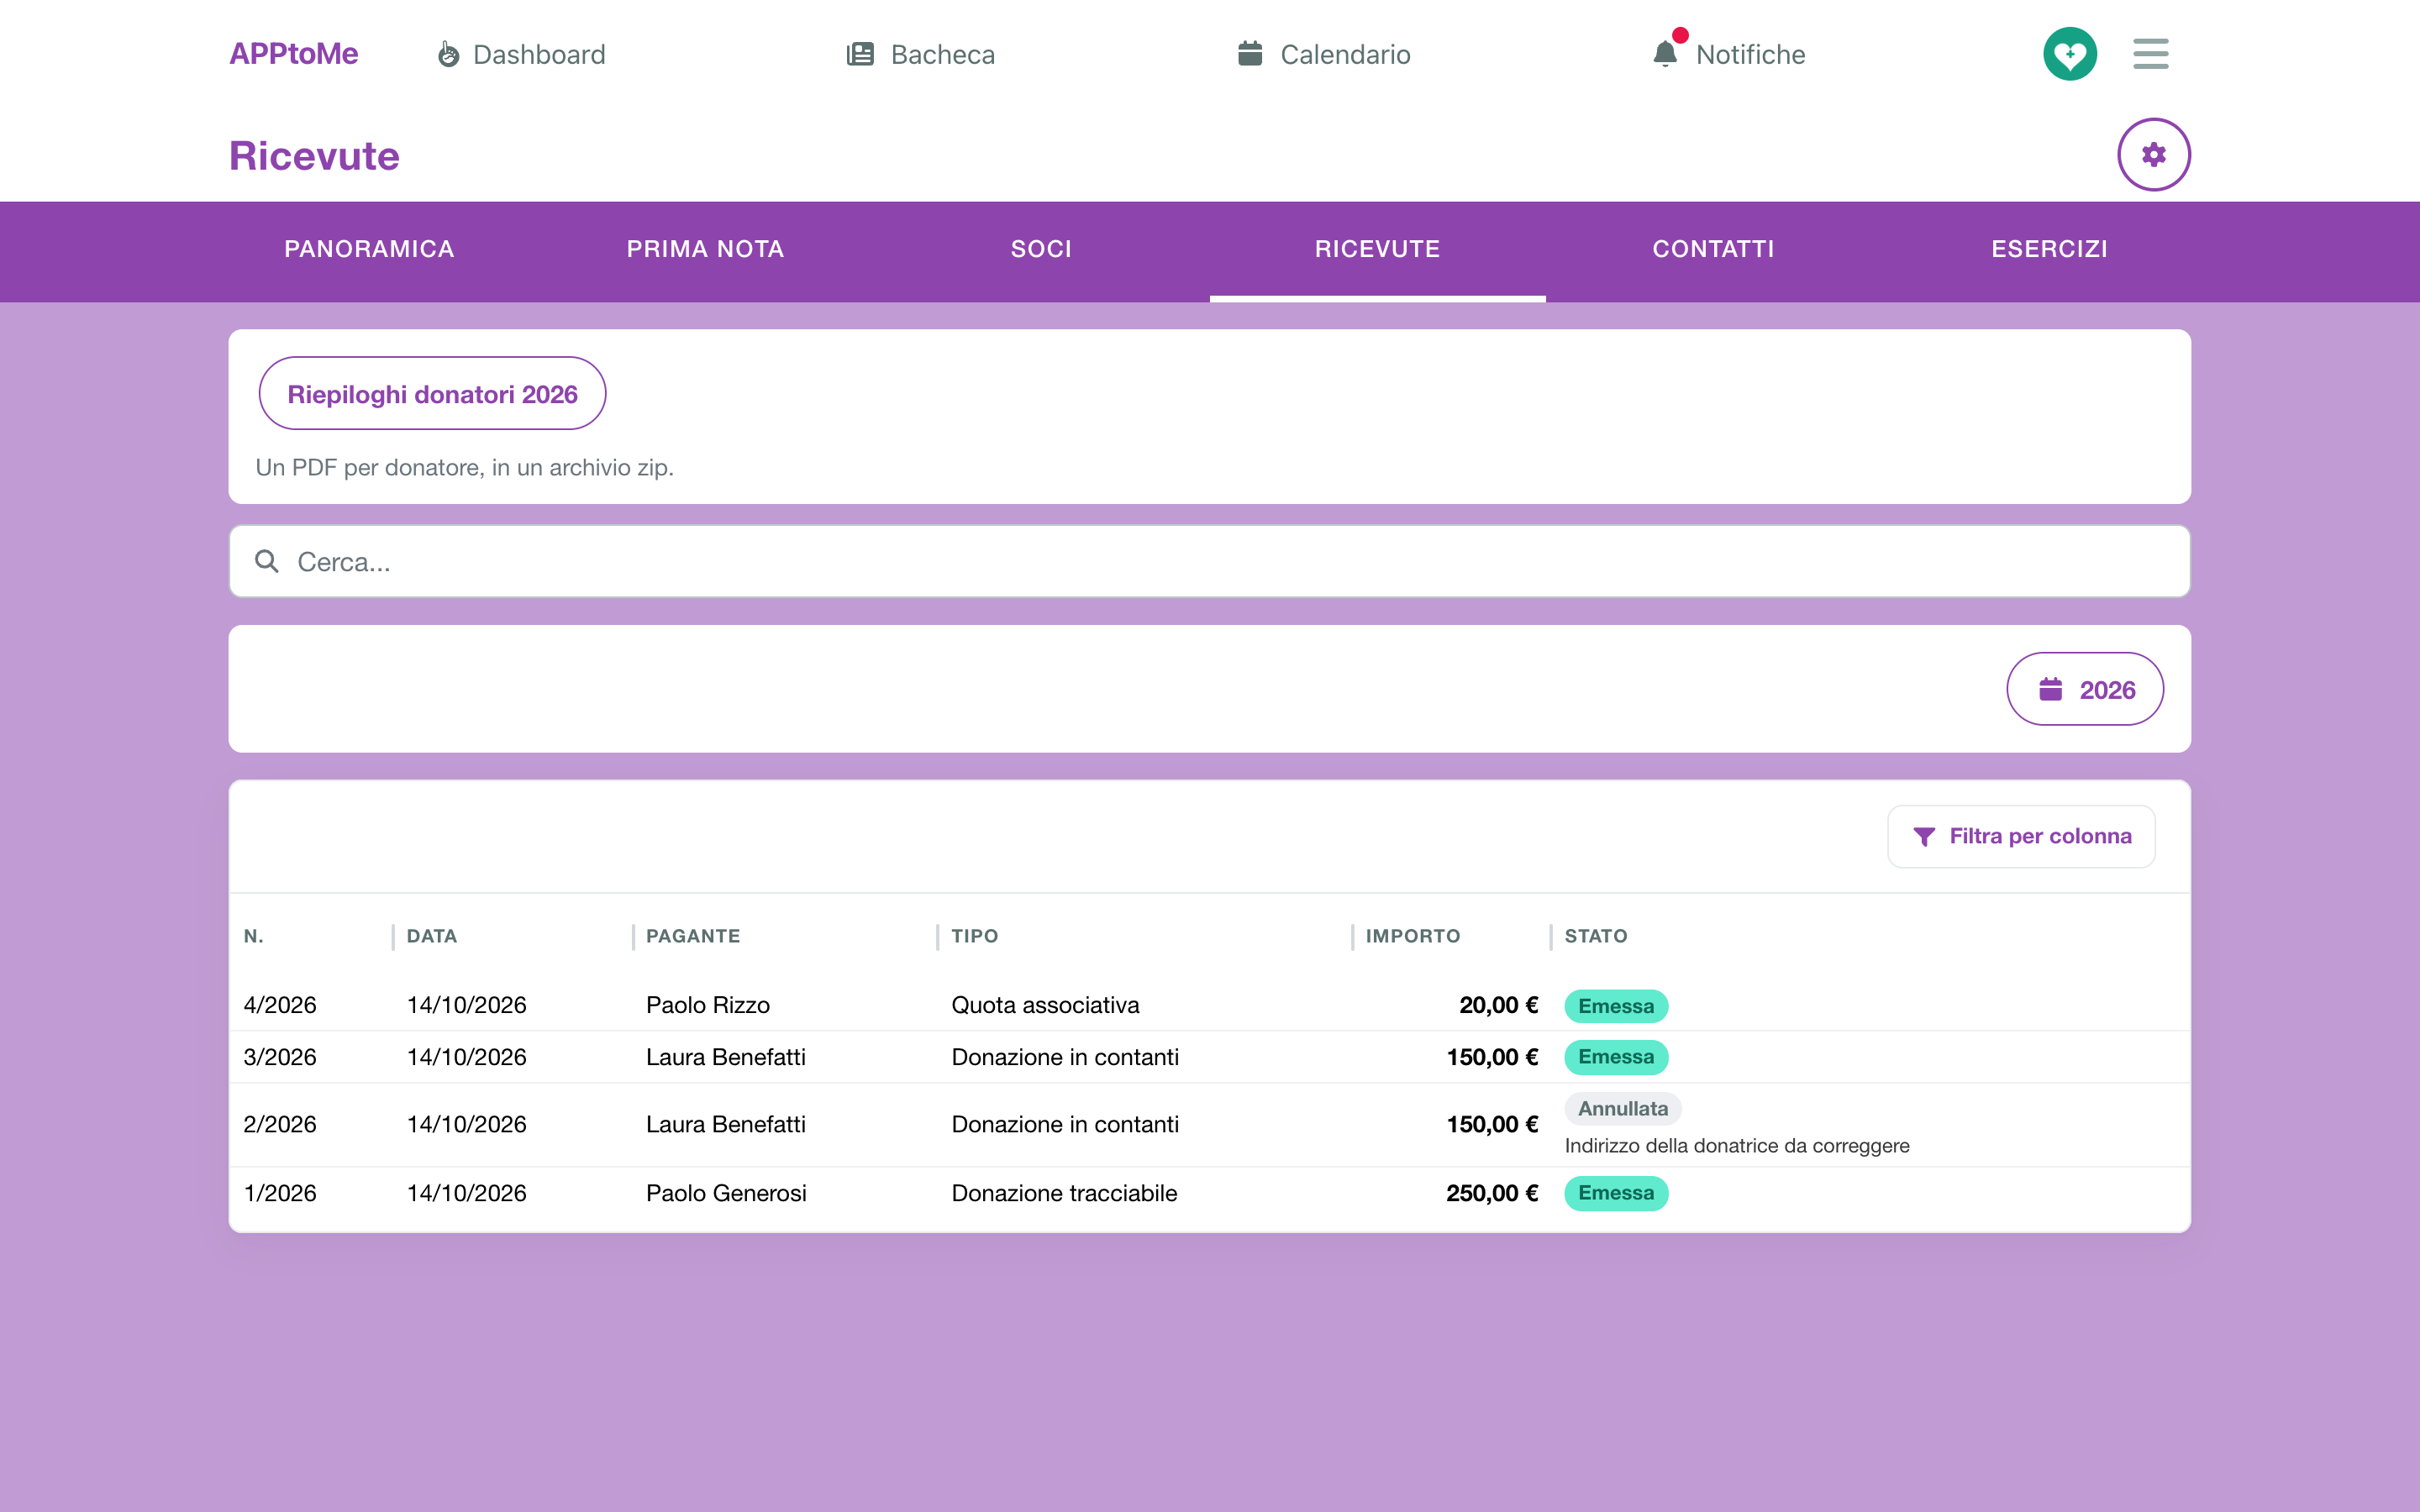
The columns are No., Date, Payer, Type, Amount and Status (Issued or Void). Tap a receipt for Download PDF, Open the entry and, for accounting managers, Void receipt.
Donor summaries
At the top of the Receipts tab, accounting managers find the year's Donor summaries: One PDF per donor, in a zip archive.
- Tap Donor summaries … The app says they are being prepared.
- Below the button the archive's row appears: Queued, Preparing, then Ready.
- Tap Download.
A single donor's summary is downloaded from their contact, see Contacts.
Fiscal years
Each year of the accounting is a fiscal year, from 1 January to 31 December. The Fiscal years tab shows one per box, newest first.
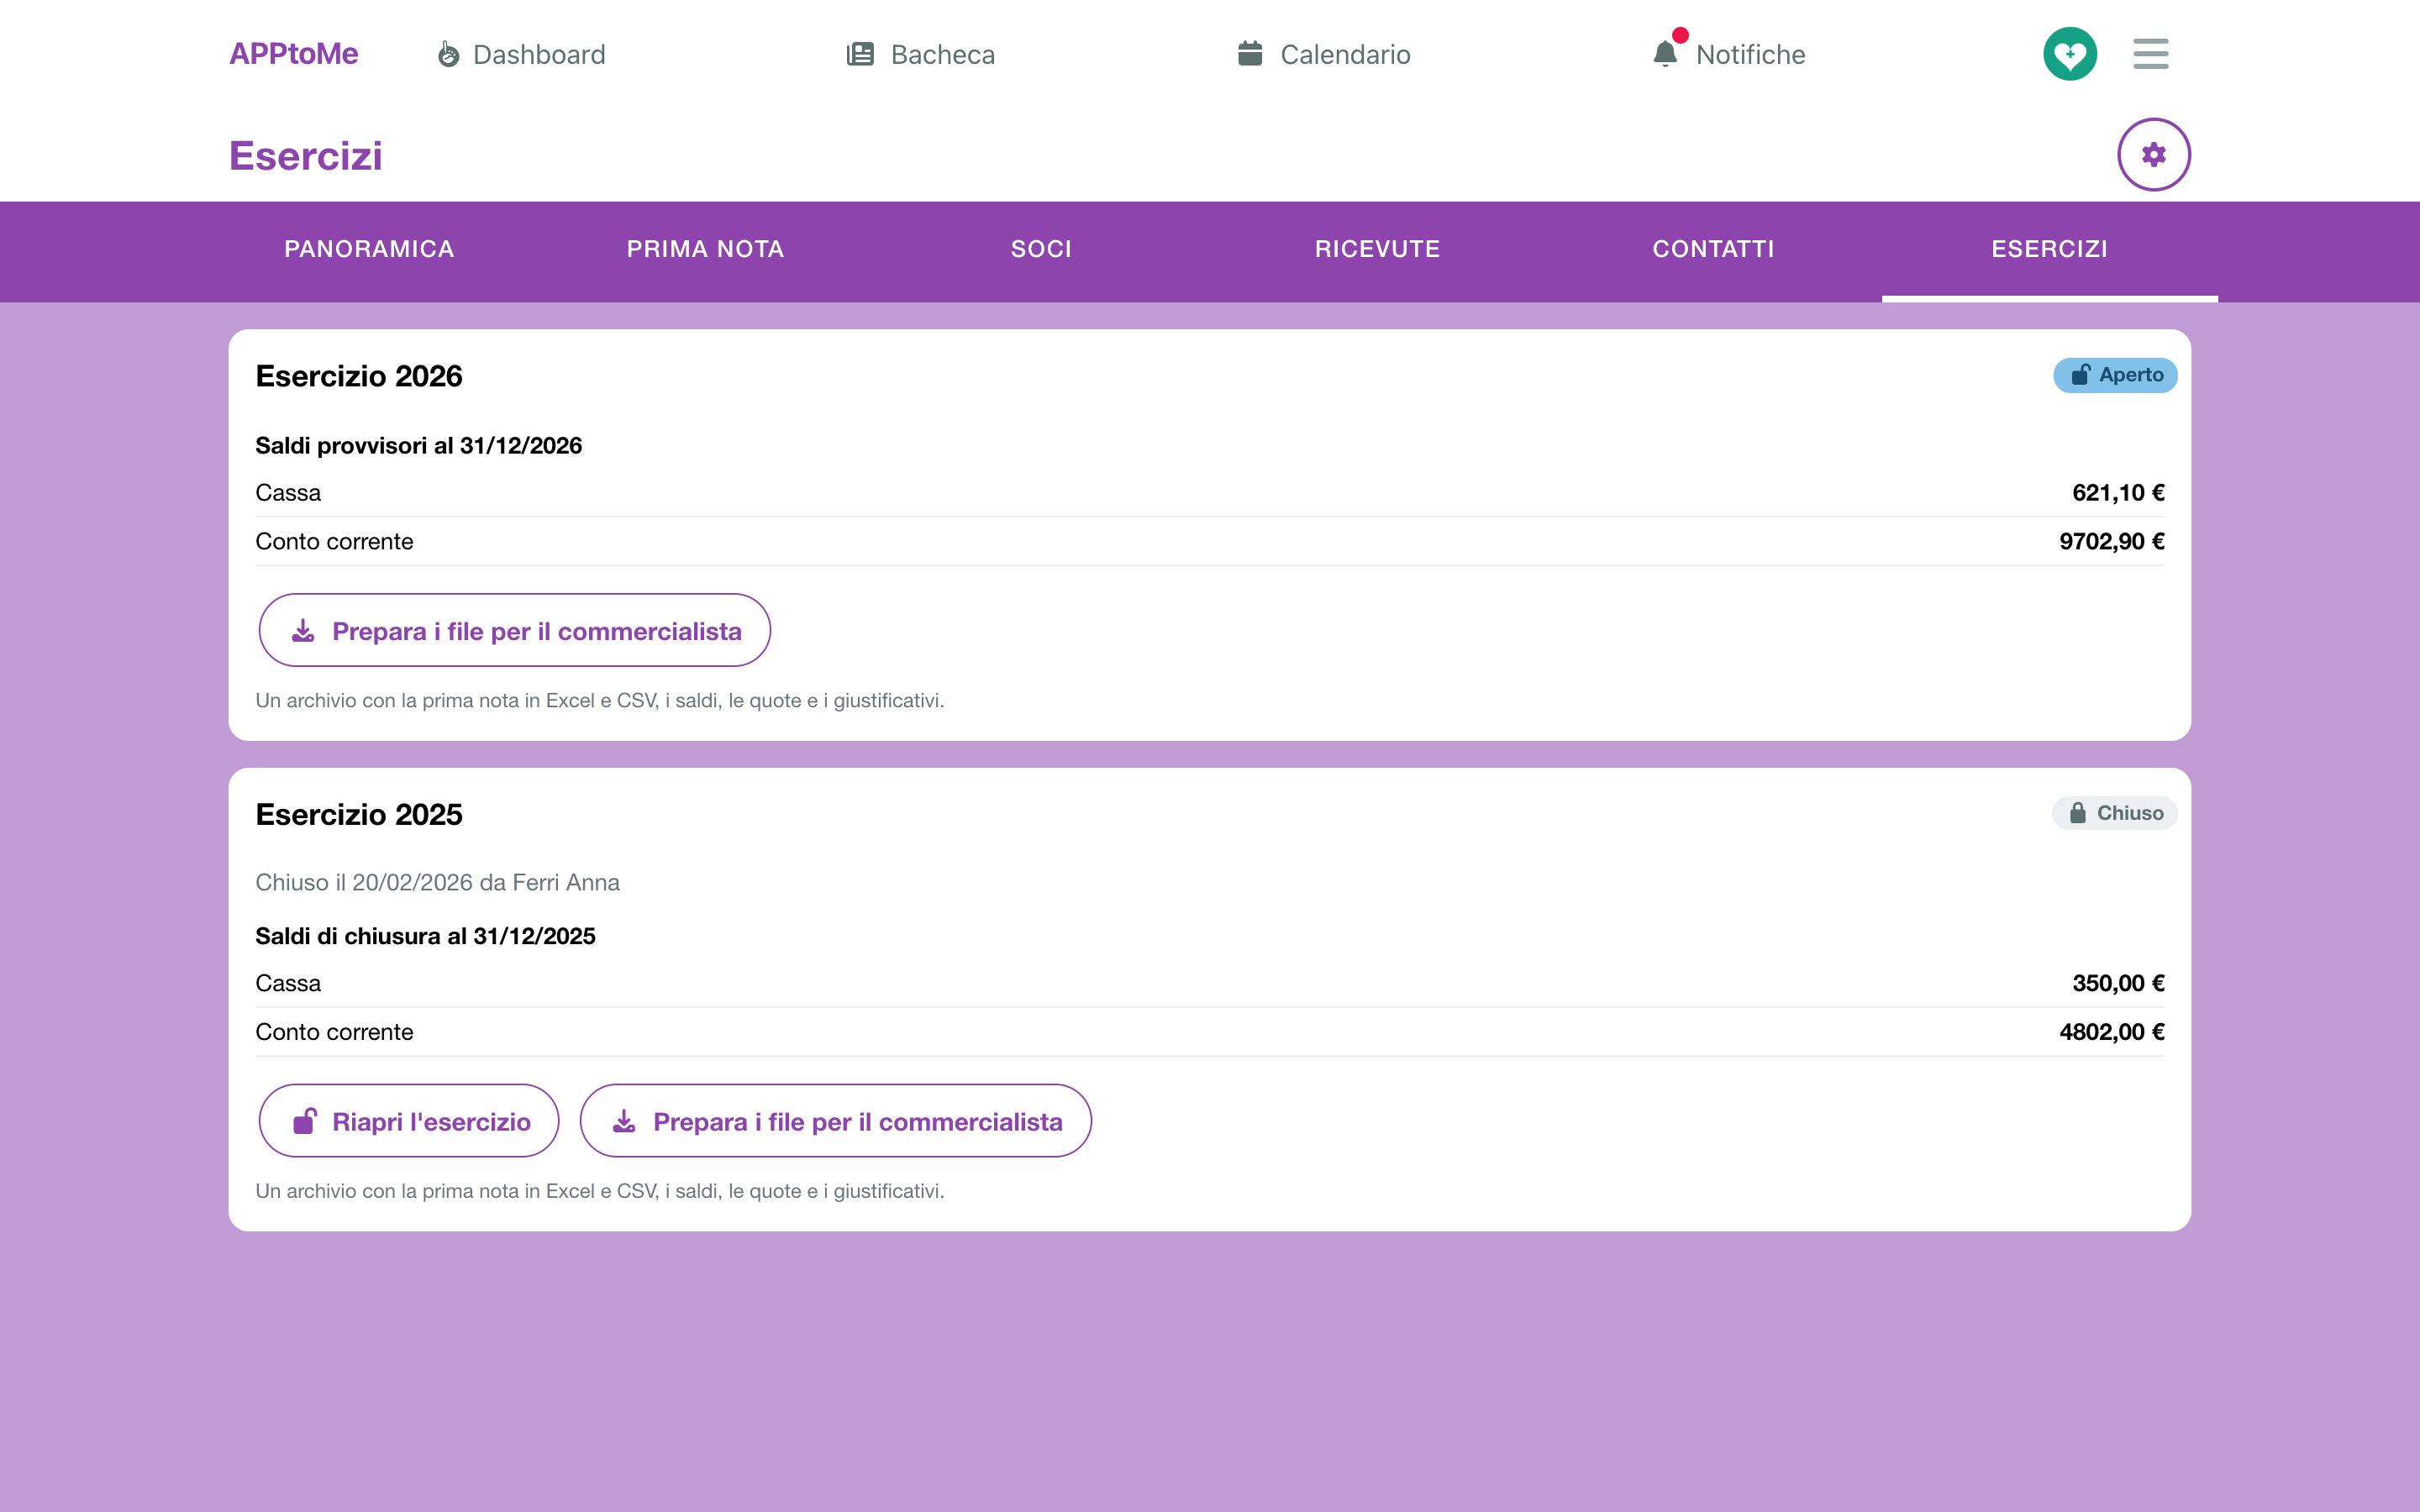
Each box says whether the fiscal year is Open or Closed, when and by whom it was closed, the Reason for the last reopening if there is one, and the balance of each account at 31/12: Provisional balances for an open fiscal year, Closing balances for a closed one.
Closing the fiscal year
A fiscal year that has ended is closed, that is from 1 January of the year after, once the journal is complete.
- Tap Close the fiscal year.
- The app asks By closing fiscal year …, the year's entries, receipts and fees become read-only and the accounts' opening balances are created in the following year. It can be reopened, giving the reason.
- Confirm.
The following year starts with an Opening balance for each account, equal to the closing balance. Those entries are not edited by hand: they change by closing the year before again.
Reopening the fiscal year
To correct a closed fiscal year:
- Tap Reopen the fiscal year.
- Write the Reason for reopening (required) and confirm.
The year's entries, receipts and fees can be edited again. When you are done, close the fiscal year again: the next year's opening balances are updated. Fiscal years are reopened from the most recent: if the year after is closed too, reopen that one first.
The files for the accountant
On every fiscal year, accounting viewers find Prepare the files for the accountant: One archive with the cash book in Excel and CSV, the balances, the fees and the supporting documents. The documents are renamed with the date and number of the entry, so from a row you find the file.
- Tap Prepare the files for the accountant.
- The row Files for the accountant appears below: wait for it to become Ready.
- Tap Download.
The archive can also be prepared for a fiscal year that is still open, for instance halfway through the year.
Accounting settings
With the gear at the top right of Accounting, accounting managers open Accounting settings. Five boxes.
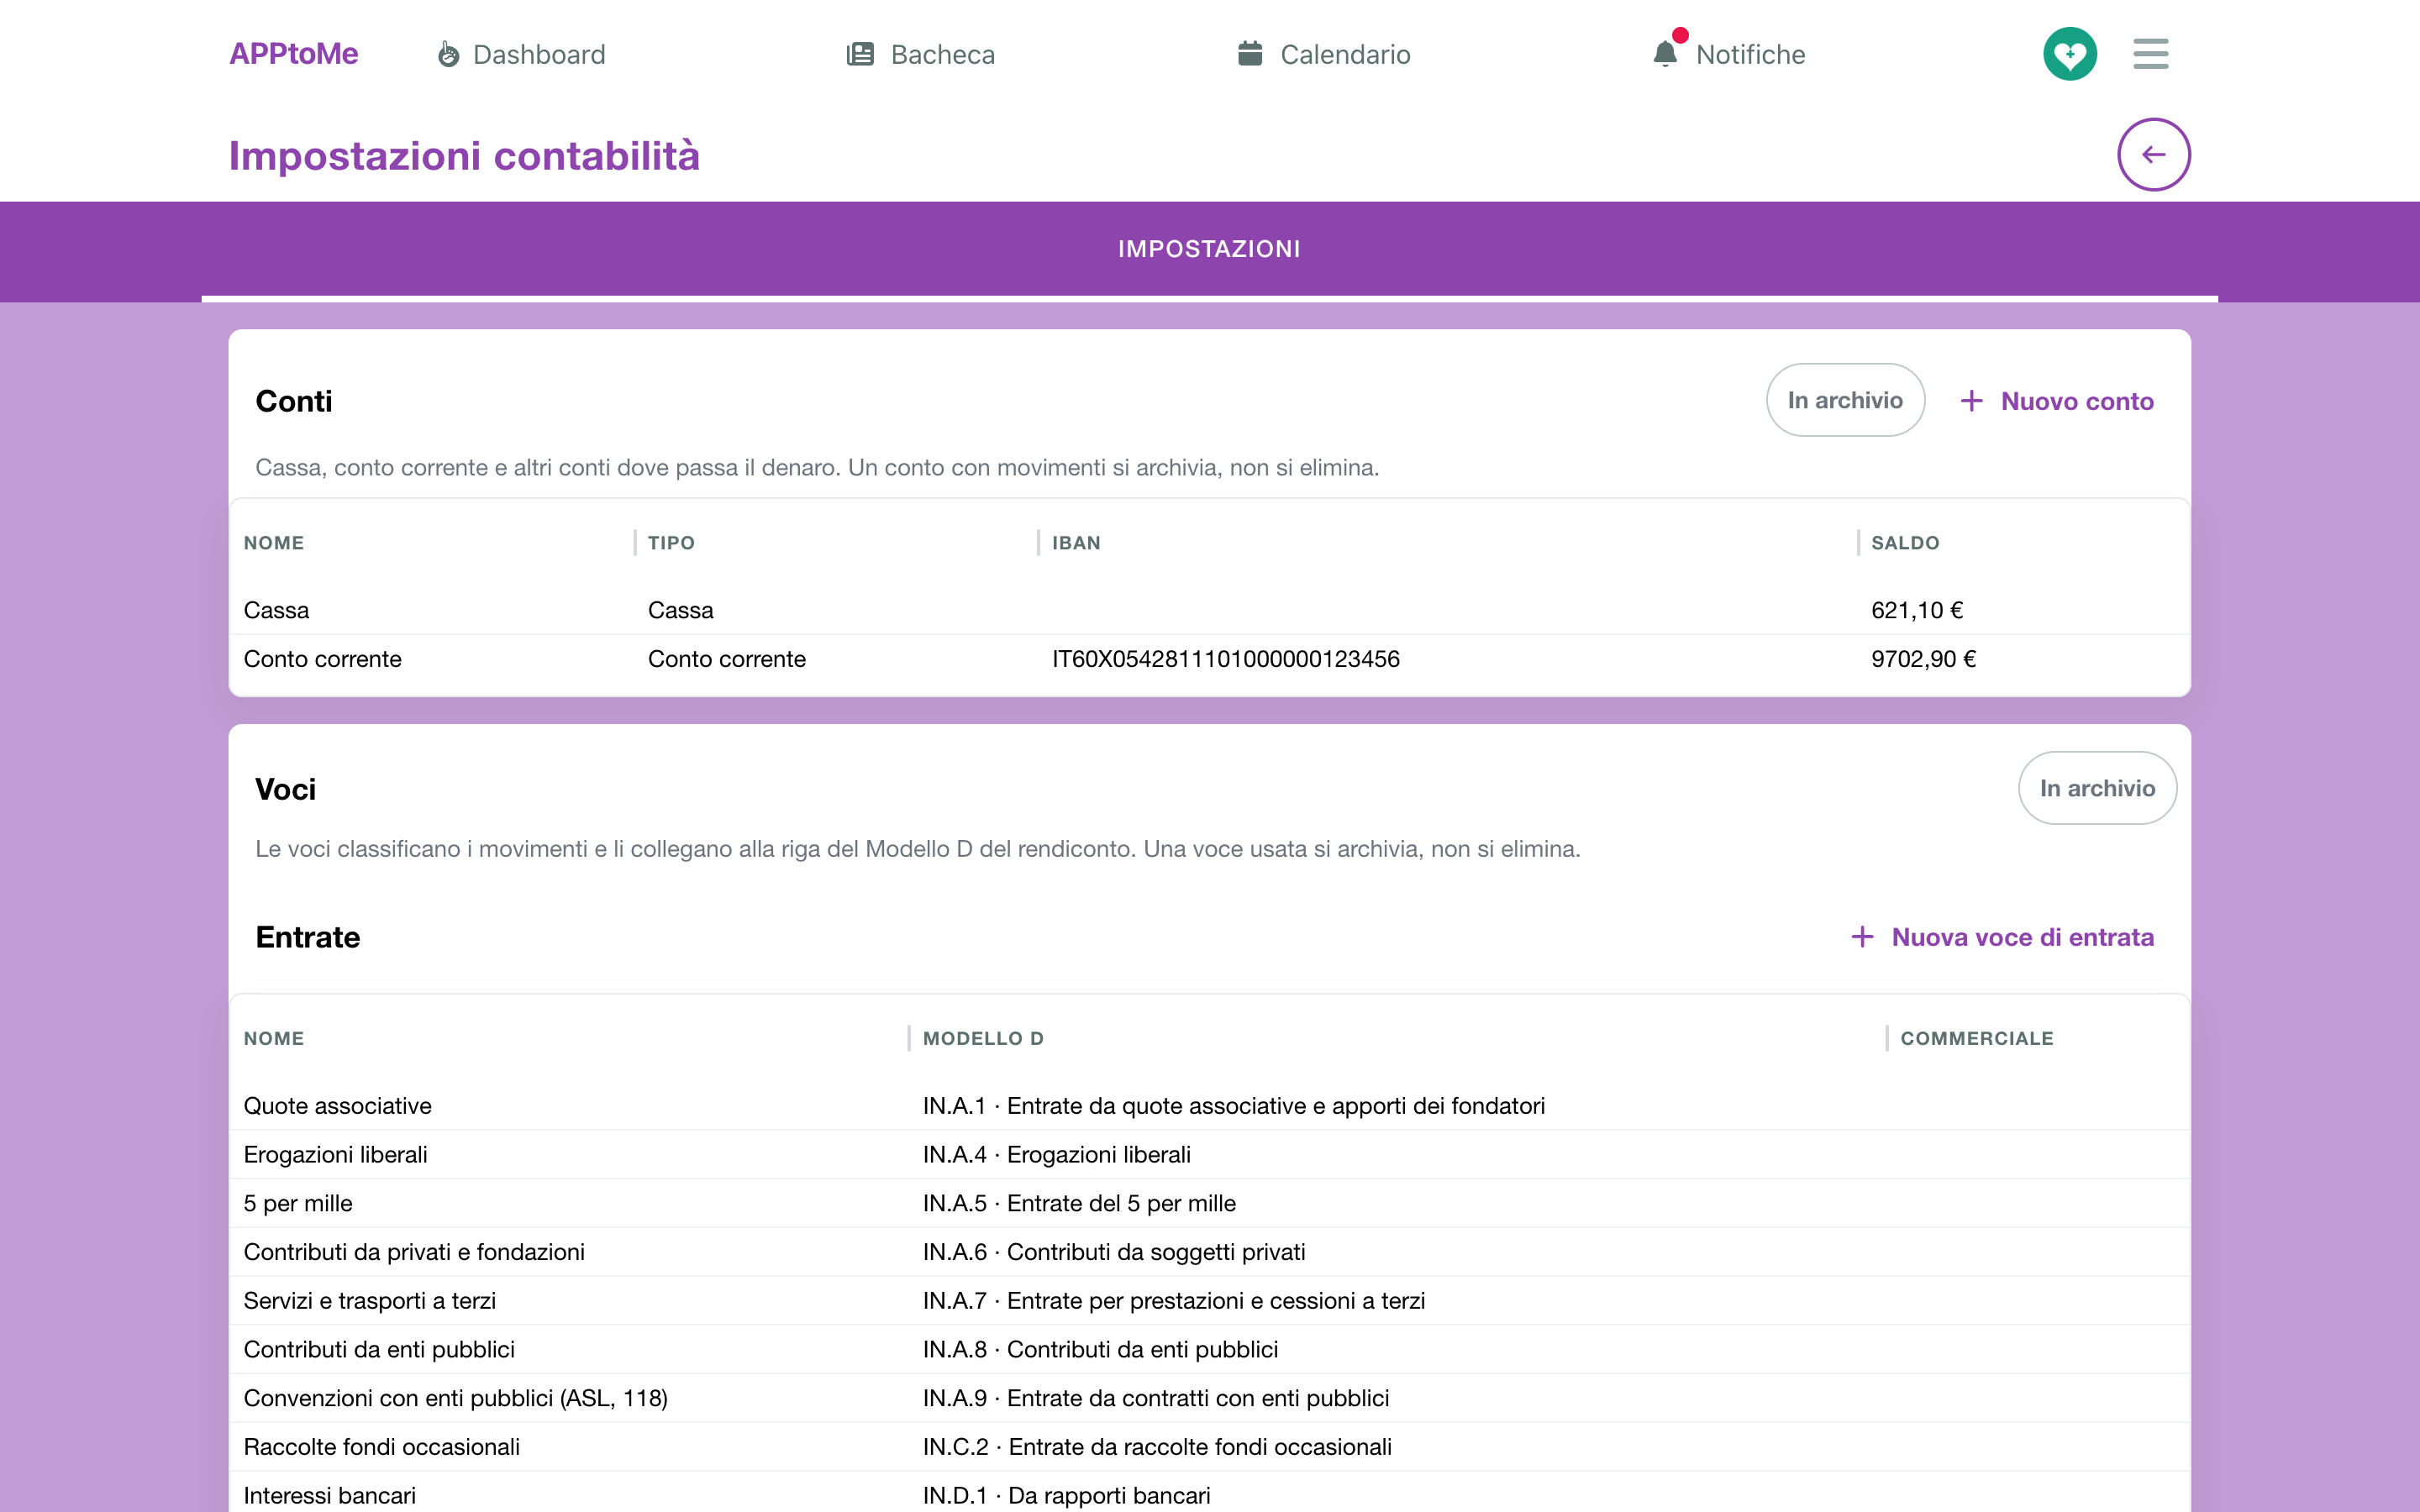
Accounts, categories and tags used in an entry are not deleted: they are archived. Tap the row and, in the window's gear, Archive. An archived item can no longer be chosen in new entries and stays on the old ones; with Archived you find it again, and Restore brings it back.
Accounts
Cash, bank account and other accounts the money goes through. For each account: Name, Type, IBAN and today's Balance. New account adds one:
| Field | What it does |
|---|---|
| Name | what you call it: Cash box, Bank account, Prepaid card |
| Type | Cash, Bank account or Other |
| IBAN | optional; the app checks it is written correctly |
| Account opening balance | What the account holds on the opening date. It can be negative, for an overdrawn account |
| Opening date | the day the balance refers to |
The opening balance becomes an Account opening balance entry in the journal. It is written only when creating the account: afterwards you correct it by opening that entry.
Categories
Categories sort the entries and tie them to the line of the Modello D statement. The Modello D is the cash-basis annual statement of Italian third-sector bodies: by choosing the category, the entry already lands on the right line.
The module comes with a list of proposed categories, split into Income and Expenses: membership fees, liberal donations, 5 per mille, contributions, agreements, fuel, medical supplies, vehicle maintenance, insurance, utilities and more. Keep the ones you need and name them the way you do.
New income category and New expense category add one:
| Field | What it does |
|---|---|
| Name | what you call it: Fuel, Festival offerings |
| Direction | income or expense. It can no longer change once the category has entries |
| Modello D line | the statement line its entries end up on |
| Commercial by default | entries recorded with Several entries and Record fees take Commercial from here |
Two categories matter for receipts: the one on the membership fees line and the one on the liberal donations line. An income entry on one of these two, with who paid, can have a receipt.
Tags
To group entries as you like, for instance by event or project. A tag has only a Name. An entry can have more than one, and the Journal filters by tag: that is how you know what the spring festival cost and brought in.
Yearly fees
The membership fee amount for each year. New yearly fee asks for Year and Amount. The amount becomes the Fee per member proposed by Record fees. A yearly fee can be deleted only while nobody has paid it.
Receipt details
The Receipts box: Who signs the receipts, where, and when the fees renew. Fill it in and tap Save.
| Field | What it does |
|---|---|
| Signatory | the name of whoever signs the receipts |
| Signatory role | Il Presidente by default |
| Place of the receipts | the town printed on the receipt. Empty: the organization's town |
| RUNTS number | Leave empty if the organization is not in the RUNTS |
| Fee renewal month, Fee renewal day | the date of the Renewal of membership fees deadline; 31 December by default |
Below, Organisation data: legal name, tax code, VAT number and address printed on the receipts. They come from the organisation's billing details and are read-only here. If any is missing, the app writes To issue receipts the following are missing: and the list. An administrator completes them with Fill in the billing details, which opens Plan and contract. In the app installed on the phone that button is not there, because Plan and contract opens from the browser; those who are not administrators read Ask an administrator to fill in the organisation's billing details.
Accounting deadlines
The accounting creates two deadlines on its own, which you find in the Deadlines entry together with the vehicle ones:
| Deadline | Concerns | When | Reminders |
|---|---|---|---|
| Filing of the annual report with the RUNTS | Fiscal year … | 30 June of the year after | 60, 30 and 7 days before |
| Renewal of membership fees | Fiscal year … | the day chosen in Receipt details, 31 December by default | 30 and 7 days before |
The filing is born with the fiscal year; the fee renewal every year, for the current year. Neither is born if its date has already passed.
On the reminder days the Upcoming deadline notification goes out, by email too, to administrators and to those with the Can manage Accounting permission.
In the Deadlines entry, accounting managers tap the deadline and choose Mark as done; they can write a Note (optional). Those who only view it reach the Fiscal years by tapping it.
If you use Odoo
The accounting stays in AppToMe: the Odoo connector does not carry entries, contacts, members, fees or receipts to the management system.
If something goes wrong
I do not see the Accounting entry — you need the module active, the Staff switch and the Can visualize Accounting permission. After receiving a permission, close and reopen the app.
I see the accounting but cannot record — you need Can manage Accounting. Or the fiscal year of that date is closed: look at the Fiscal years.
The fiscal year is closed: entries, receipts and fees can no longer be recorded, edited or deleted — reopen the fiscal year, with the reason, and then close it again.
The fiscal year has not ended yet: it can be closed after 31 December — a year closes only from January of the year after.
The Receipt box does not appear — a receipt exists only for an income entry on the membership fees or liberal donations category, with the person or contact who paid. Check category and payer in the entry.
The entry cannot be deleted — it has a receipt. If it is issued, void it; a voided receipt is kept with its entry.
A member shows Missing but has paid — the fee was recorded with Record income: record it from Record fees and delete the one entered by hand.
The file is larger than 5 MB — shrink the PDF, or photograph the till receipt with Take a photo.